Showing posts with label front door. Show all posts

Sunday, December 6, 2015

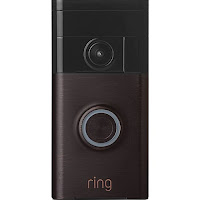
Installing ring - the video doorbell

One of the things that I have been wanting to do for a while is set up some security cameras around the house for a safety measure.  I found a video doorbell online that allows you to see who is at your door before you open it.  Oftentimes, we get solicitors, but not knowing who is at the door, I peak out the window and they see me!  There goes my cover of pretending I'm not home if I don't want to answer the door.  I don't like the fact that my kiddos rush to the door without a second thought either.  Therefore, I thought I'd take the plunge and buy me one of these gadgets.  Now, the problem was figuring out which one.  I narrowed it down to two different doorbells. 

http://www.amazon.com/gp/product/B00N2ZDXW2/ref=as_li_tl?ie=UTF8&camp=1789&creative=9325&creativeASIN=B00N2ZDXW2&linkCode=as2&tag=crafc0rn-20&linkId=M7QZJ43LA6LEPD5V%22%3ERing%20Wi-Fi%20Enabled%20Video%20Doorbell%3C/a%3E%3Cimg%20src=%22http://ir-na.amazon-adsystem.com/e/ir?t=crafc0rn-20&l=as2&o=1&a=B00N2ZDXW2%22%20width=%221%22%20height=%221%22%20border=%220%22%20alt=%22%22%20style=%22border:none%20!important;%20margin:0px%20!important; http://www.amazon.com/gp/product/B00PV7WI1Q/ref=as_li_tl?ie=UTF8&camp=1789&creative=9325&creativeASIN=B00PV7WI1Q&linkCode=as2&tag=crafc0rn-20&linkId=NE3USB5F75HTQN4D">SkyBell Wi-Fi Video Doorbell Version 2.0 (BRONZE)</a><img src="http://ir-na.amazon-adsystem.com/e/ir?t=crafc0rn-20&l=as2&o=1&a=B00PV7WI1Q" width="1" height="1" border="0" alt="" style="border:none !important; margin:0px !important     

There was the ring and skybell that I was looking at.  I noticed this morning there is also the august brand that hasn't been released.  I can't remember the reason that made me decide to go with the ring brand.  I'm sure it had to do with the reviews.


I chose the venetian bronze color because I had just painted my hardware an oil rubbed bronze so it would match nicely. Opening the box, you see all these fancy tools to help you install your new doorbell.


Here's the doorbell I started with.  It is completely boring and very ugly.  I've wanted to replace this thing since I moved in.


First up, I turned off the power to the doorbell.  Then it was time to remove the old doorbell.  I removed the screws and then pulled the door bell off, cutting away at the sealer.  Disgusting, huh? 


I had to then drill through the brick.  Can I say, this is SOOOO hard to do.  Because of the location of our previous doorbell and me wanting to hide the two screw holes already there, I had no choice, but to have to drill through brick TIMES FOUR!  I'm telling you now.  If you have a choice weather or not to drill through the mortar or a wood trim, do it!  Although the kit comes with a drill bit, our brick was SO very hard that it wore that out and I had to buy another masonry bit to replace it.


Drilling the four holes was hands down the toughest part.  Next up was pulling the two doorbell wires through the back plate of the doorbell and attaching it to the screws.


I screwed the blue wire to the left and the white wire to the right screw.  It was a complete guess on my part as far as which wire went to which screw.


I screwed the top plate on top and now was the time to test it out.  I installed the ring app, set my settings and gave it a go.


It worked!  My kids had so much fun watching themselves on their devices.


What's the verdict 6 months later on this little gadget?

http://www.amazon.com/gp/product/B00N2ZDXW2/ref=as_li_tl?ie=UTF8&camp=1789&creative=9325&creativeASIN=B00N2ZDXW2&linkCode=as2&tag=crafc0rn-20&linkId=M7QZJ43LA6LEPD5V%22%3ERing%20Wi-Fi%20Enabled%20Video%20Doorbell%3C/a%3E%3Cimg%20src=%22http://ir-na.amazon-adsystem.com/e/ir?t=crafc0rn-20&l=as2&o=1&a=B00N2ZDXW2%22%20width=%221%22%20height=%221%22%20border=%220%22%20alt=%22%22%20style=%22border:none%20!important;%20margin:0px%20!important;

I can't live with out it.  I am surprised by the advantages still today.  I set my doorbell to be motion activated. Therefore, even if no one rings the doorbell, my phone notifies me whenever someone is at the door.  This comes in so handy during the holiday seasons when I am buying all my christmas presents online.  Whenever the delivery man comes and drops off the package, I can see on my phone the packages and bring them inside!  They don't even ring the doorbell anymore, but I know the packages are there because I can see them on the floor through the camera.  I also get notified from UPS via text, but sometimes that notification comes 30 minutes later and I never get notified if it is FEDEX or USPS so that doorbell is awesome especially in the evenings when I wouldn't even know the packages are there (FEDEX for us delivers in the evening and never rings the doorbell to let us know).

The doorbell also lets me know when the kids leave the house.  Since I work early in the morning, its nice to know when my kids leave for school. I can't tell you how many times my kids let me know that dad overslept and they were late!  

Aside from the fact, its awesome to see who is at the door from your own bedroom so you don't have to get up if you don't want to, it is even MORE awesome to know who is at the door when you are not home.  Just this week, we were remodeling our pool and workers were over working on it.  I couldn't stay because I had to take the kids to piano practice.  Yet, while I was gone, the doorbell rang so I picked it up on my phone to answer it because I could see it was one of the workers needing to show me something.  I was able to answer the ring and talk with him to let him know I was only a few minutes away.  Instead of him leaving and then having the company call me back, he waited for me to personally show me around.

Those are the advantages.  Now for the disadvantages.  It's great that there is a motion-activated sensor, but there is also a downfall to it.  I see every car that "slowly" drives by.  I live in a culdesac and there are only 3 other houses at the end of the street so I don't get too many cars that drive by slowly, but if you live on a busy street, the motion-activated sensor could be annoying.  The other disadvantage is the lag.  Sometimes, there is a slight delay from when the person rings the doorbell to when you are notified.  The last thing is that you cannot see through the camera in real time.  I wish there was a feature where you can see out your door without being activated by a motion.

For me, the advantages far outweigh the disadvantages to the point I contemplate installing one for our backdoor as well - not necessarily for the "doorbell" feature, but for the motion-activated camera.  In the end, it was worth the purchase.  I wasn't able to find any discounts or coupons or sales, but its one of the purchases I would still make again, regardless.  Are there any gadgets you have bought that you just can't live without?

Sunday, November 29, 2015

Gel Staining the Front Door and Spray Painting the Door Handle

I know its been way too long since I last posted something here.  Is there anyone still out there?  Life's been a little hectic to say the least and while I am still working on a lot of home projects, I really haven't had the time or motivation to post them.  Working longer hours at my job and chauffeuring the kids around to all their activities has left me no time to really do anything else so a project that would normally take me a weekend or two to complete is now taking me months.  That being said, having a nice long Thanksgiving weekend has sort of rejuvenated me.  That and trying to upload my 2000+ pictures off my camera has left me looking back on all the projects that I haven't posted.

One thing that I wanted to do this past summer (yeah, several months ago!) was to beautify/update my front house.  While, cutting down bushes and trimming trees do a lot to maintain your home, I wanted to do a lot more.  On my to-do list was re-staining the front door, changing out the torn weather strip, updating my hardware, installing landscaping lights, replacing my door bell, installing cameras and changing out my lanterns for motion-sensored/dusk till dawn lights.  My outside list kept growing so I had to just jump in and pick something to start with.  

First up was refinishing my front door.  The problem was I wanted my door to "look" stained, but couldn't really just go out and buy any stain.  The reason being was the fact that I had a fiberglass door.  When I built my house, I didn't even think about the differences between doors.  I told them to build it like the model which they did, with a fiberglass door.  I was kicking myself in the butt this summer not choosing an all wooden door UNTIL I discovered all the benefits of a fiberglass door.  It doesn't weather as fast (most or all of my neighbors that have a wooden door have had to restain their door only 3 years after they moved in).  It took 8+ years before my door started showing signs of wear and tear and I don't have to worry about mildew or warping with my door. 

That being said, it was time to re-stain my door.  You can see the stain was faded and started to chip off.


In my research, I found out that I needed to use a gel stain in order to refinish my fiberglass door because fiberglass does not absorb like wood.  I thought, great, I'll just walk into Lowe's and pick out my stain color, easy peesy, right?  Hmm..nope.  The major box-stores didn't carry gel stain so I had to go to an actual paint store for it.  I ended up buying a quart of the Minwax Gel stain in Walnut color and Minwax Waterbased Helmsman Spar Urethane to seal the door.


After purchasing my stain, I had to wait for a nice weather day since I would be leaving my door partially opened while it dried.  I prepped the door by taping off all the areas I didn't want stain on.


I decided to paint the trim around the door as well so I filled in all the dents and nail holes that the builder neglected to do.


I also removed the hardware so I didn't have to worry about accidently getting stain on it.


I washed to door with some soap and water to clean up any debris.  When the door dried, I sanded the door to remove any stain chips and scratches. I cleaned off all the dust and started staining.  I applied two coats of the gel stain right on top of the existing stain and waited a few minutes before wiping off the excess. It was extremely easy as gel stain doesn't drip like normal stain.  In fact, it looks a bit like jello, but it really did make my fiberglass door look like it was stained wood.

From this:


To this:


What a difference, huh?  When I was done staining the door, I painted the trim of the door in the same color to freshen it up a bit.


A week later, I applied the urethane onto the door to seal in the stain and keep the door looking new longer.

Now on to the hardware.  My door lock was horrible.  It would stick, the key wouldn't work and the clear polish was peeling away from it so it made it look terrible.  My hardware looked so bad I was ready to replace it completely.  I had already chosen the new oil rubbed bronze hardware.  However, when I went to the store, they didn't have any in stock so I figured that I would, while I waited for the new hardware to become in stock, just spray paint my door knob with some oil rubbed bronze paint. 

I used this Rust-oleum Universal Metallic Oil Rubbed Bronze spray paint to cover my hardware.  I already had it in my garage and have used it on many projects.  I love the way I don't have to prime the surface.  I sanded the hardware to remove what clear finish was still left on it.  I used a very fine grit sand paper so that the scratches would be light and easily covered with paint.  Then I covered the actual lock with some tape because I knew I did not want that to be painted.  I even sprayed the screws so that it would match the hardware.  After about 5 light coats, and several hours of drying, I placed the hardware back on my door and the verdict?

 
I LOVE the way it turned out.

I had intended this to be a temporary solution as I thought that with daily use, the paint would not hold up, but can I say that after 6 months of using the door knob daily, there isn't  a scratch on it?  It still looks new.  Also, when I removed the hardware and placed it back on, it seemed to line up better and now the door doesn't stick anymore.  It's been a win win and at this point, I don't plan on replacing it.  What I do plan on is spray painting all the other exterior door handles.

After I stained the door, I took the liberty of going ahead and replacing the weather striping on the bottom of the door.  Since I have a fiberglass door, it has a little groove on the bottom of the door that allows a weather strip to snap in place.  I bought the MD Kerf's Mount Door Bottom  to replace the existing torn one on my door.  The best part is that I get reimbursed from my electric company for the purchase for being more energy efficient.


I really love the way it turned out.  It doesn't look like much in these pictures, but it is WAY different up close.


Okay, so you can't tell from these pictures, but I also replaced the doorbell, but that will have to be in another post.  For now, I am so happy to step foot onto my front door everyday and the kids are happier too now that they can open it themselves with ease.


The total project was about $30 for all the stain as I waited for a 40% off day (it happens 2-3 times a year at sherwin williams and had a $10 coupon on top of that that I found on their website :)  I spent another $10 for the weather strip (which was reimbursed by my electric company).  For about 3 hours, it saved me $300 which was the quote to restain just the exterior side of my front door (I actually stained both sides so they would match), not to mention taking care of my door knobs.  This do it yourself project was completely worth it.

So how many things was that I checked off my list?  Restaining door - check, new hardware (well new looking) - check, new weather stripping - check and new door bell - check.   That's a lot, but oh so many more to go.  I can't wait to share them with you all.

Related Posts with Thumbnails