
 Tomorrow is Valentine's day and ever since I saw Pottery Barn's Valentines Chair Backers for sale two years ago. I have wanted them. They have always been sold out, this year, being no exception. I did find some on ebay, but the prices were a little outrageous for me. I would have to spend over $150 for 4 chair backers and that would not include the personalization. By looking closely at the posted pictures, I decided that I would create my own.
Once again, here is Pottery Barn's version sold for approximately $35-$45 on ebay:
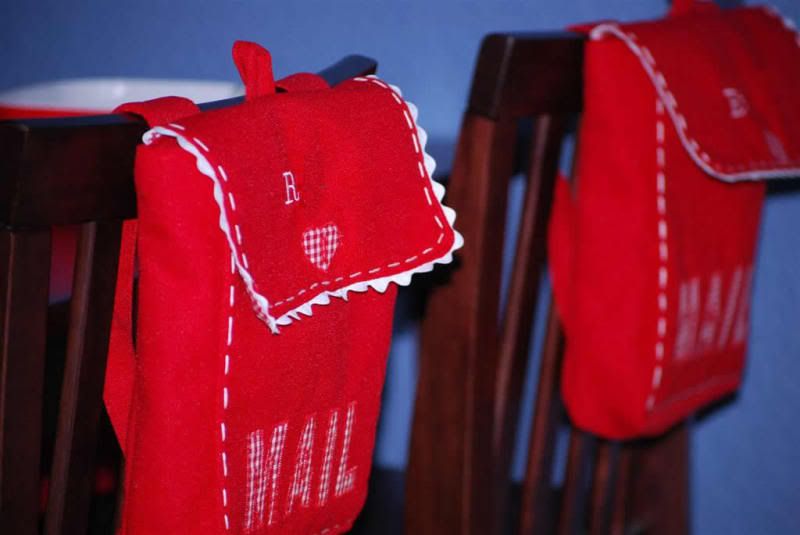
 and here is the one I made for a mere $1.75
 Just so you know, I did embroider all of A's name on there.
Here is how I re-created the Valentine's Chair Backers from Pottery Barn.
 First I created a pattern for the chair backers using the information ebay sellers posted about the size. I drew out all the pieces on a sheet of white paper.
 Then I went shopping for some fabric. I tend to buy more than what I need, but the fabric was only $1.50 per yard so it didn't cost too much. I bought about 3 yards of red fabric, but I only used 1 yard for the four chair backers (because the fabric width was 74"). I bought 3 yards of fusable interfacing for $1.57 per yard, but only used about 1 1/2 yards. I bought a package of ric rac ribbon for the lid of the chair backer. I would also suggest buying .25 yards of wonder under (so the letters can stick to the fabric). It was a good thing that I already had the red gingham in the closet because it was sold out at the fabric store. You will also need a pair of buttons and some velcro pieces.
 Fabric Cuts - all seam allowances will be a quarter of an inch
red fabric
- front and back ( 2 - 7.5" x 9")*
- sides and bottom (23" x 2.5")*
- back straps (2 - 11" x 3.5")*
- top flap (7.5" x 5.5")*
interfacing
- front and back ( 2 - 7" x 8.5")
- sides and bottom (22.5" x 2")
- back straps (2 - 10.5" x 3")
- top flap (7" x 5")
- front and back ( 2 - 7.5" x 9")
- sides and bottom (23" x 2.5")
- top flap (7.5" x 5.5")
- small piece for front "MAIL" letters
 Cut out your fabric pieces using the dimensions listed above.
 I printed out "MAIL" off the computer and cut them out. Then I traced it onto the fusable interfacing backwards.
 Then I ironed on the interfacing to the gingham. If you have wonder under, now would be the time to iron that on top of the interfacing.
 Proceed to iron on the interfacing to all the pieces that require it.
 Cut out the M-A-I-L letters
 Arrange them on the fabric. If you ironed on wonder under, peel off the backing and now iron the letters to the front piece of the chair backer. If not, pin the letters onto the fabric.
 Zig zag stitch around each letter.
 What the front should now look like
 What the back should look like
 Pin the side piece all around the front piece of the chair backer
 Careful of the corners
 Sew into place
 Open up the side and take a piece of floss, stitching around the front piece of the chair backer.
 When done, it should look like this
 Now fold back the side piece and pin on the back piece of the chair backer. Sew in place
 Take the straps and fold in half length-wise. Sew side together
 Now take the two straps and turn them right-side out.
 Set aside the straps
 Now sew the lining of the chair backers, using an inseam slightly larger than .25" so that it may fit inside the chair backer.
 When done, insert the lining wrong-sides facing each other.
 Fold the interior lining and exterior chair backer so that it is facing each other. Pin in place.
 If you wish to personalize your chair backers, proceed to do so. Take the red flap to embroider.
 Embroider the name. You could also cut out letters, similarly to the MAIL letters process if you do not own an embroidery machine.
 Once the name is embroidered on, place the gingham on top of your embroidered name, right-sides facing each other. Notice, that my red piece is much larger than the actual dimensions I listed previously. My embroidery machine hoop is larger than the flap piece so I had to accommodate for that. I will cut off the excess after I sew all the pieces together.
 Insert the ric rac between the red and gingham for the three sides, leaving the top of the flap without ribbon. Pin in place and sew down.
 Next cut out the heart that is on the flap. The process is similar to the M-A-I-L letters. Trace onto the interface.
 Iron it on and then cut it out.
 Pin in place and zig zag stitch around the heart.
 For the key hole stitch that is on the heart, I used the "34" setting on my regular sewing machine.
 I sewed it upside down on the heart.
 After wards, sew the button holes onto the straps.
 Pin the flap and straps onto the body of the chair backer.
 Sew all around the opening of the chair backer. Add buttons to the back of the chair backer and velcro the the flap.
  Here is the finished chair backer.

 I used the extra red fabric to create a table runner for the kids table.
 I can't wait until tomorrow to surprise the kids. I found a bunch of little things for the kids clearanced to stuff the chair backers. Happy early Valentine's Day


.JPG)

.JPG)
.JPG)


.JPG)

.JPG)


.JPG)
.JPG)


.JPG)

No comments:
Post a Comment