

To build this bed, I looked at the farmhouse bed plans on Knock Off Wood. I modified the measurements to build my daybed. I drew out my plans to make my own list of materials.

Then, I went and bought the wood. The hardest part about buying wood is trying to find the straightest pieces. It took a while rummaging through the piles of wood to find decent pieces. I am sure the employees thought I looked funny, but I didn't care. When I came home, I laid out all the pieces of wood and started making my cuts. Here are my wood cut dimensions.
I would like to warn you about the height of the bed. Since this bed is for my 2 year old, I wanted it a little lower than normal. To get my mattress to fit under the daybed, I had to buy a 6" mattress for the trundle. The top mattress which has a pillow top, measuring 8.5" in thickness did not fit under the bed in the trundle. Therefore, should you want a thicker mattress, increase the height of the foot board to accommodate this, perhaps adding another 2.5 inches. If you do that, remember to increase the headboard legs as well.

Then I started to assemble the headboard. I laid the runners on the floor and started laying the panel pieces on top. I put the pretty side facing down so that I could nail from behind. I used some pieces on the edges to line up the wood to make it straight. If my pictures are not self-explanatory enough, Knock Off Wood does a much better job at showing you how to lay out the wood.
headboard:

Don't forget to glue the boards down before you nail it into place. Glue is what actually keeps the boards staying together.

Since some boards were not perfectly straight, I clamped them down before nailing them into place to ensure they would be straight.

Once you are done nailing all the panel pieces into place, lay the runners on top of the paneling boards to finish it up.

This is what the front of the head board looks like. Since you nailed everything from behind, you shouldn't see any nail holes from the front.

Now line up the legs of the head board.

I made some changes after I stained my bed so the next shot shows the headboard stained, but you should do this step before staining. I took a 1 x 3 and cut it so there would be a gap. This gap is where I shall slide my side board into place. This will provide the support that is needed.


I next pre-drilled holes into the legs and screwed the 2 1x3s to the headboard.

I countersinked the screws so that it would be flush.

Next, I nailed in another 1 x 3 on top of that piece to hide the screws. I didn't want any screws showing on my bed. The next step was to add the top molding pieces. I measured the board so that it was an inch larger on each side of the head board.


Next, I decided I wanted a small piece of molding right underneath the top piece. I wanted it to wrap around the headboard.

I had to angle my cuts to be able to wrap it around.

I added a 1 x 1 to the bottom of the headboard where I want to later put the support boards where the mattress will lay. I later stained this piece to match the headboard.

After my headboard was complete, I sanded it for a smooth finish. Since this bed is for my son, I rounded all the edges so there wouldn't be any sharp corners.

Here is a picture of the headboard before I made changes (added cut-outs and widen legs).


Once again, here is the groove to allow the side board to rest.

Originally I was just going to use a 1 x 6 for the side boards, but I liked how the foot board looked and wanted the same look all around the bed so I decided to make the side boards to match. The process is exactly the same, except there are no legs and there is an additional panel piece that extends on both edges of the side board.

I put the bed together allowing me to drill all the necessary holes for final assembly.

The trundle front is the same as the foot board without the top and bottom additional pieces. The sides are made from 1 x 10's cut at 41.5". The back is also 1 x 10 cut to 74.5". Since I am still a little squeamish about using the circular saw, I made my husband make these cuts. You can get them cut down at the hardware store, but after spending so long searching for straight boards, I was ready to get out of there.

Here is a funny picture of my bed partly stained.
I added the same 1 x 1 support pieces for the trundle and placed an OSB board on top. I had the store cut the OSB board to fit the inner dimensions of the trundle (74" x 38.5"). This is what it looks like underneath the trundle. I screwed the OSB down onto the supports. Then I attached the 6 wheels to the OSB board to allow the trundle to move. Sorry, I forgot to take a picture of the wheels. Please visit Knock Off Wood for instructions and pictures.

Here is a funny picture of my bed partly stained.

I stained the bed with 2 coats of a rich espresso finish and applied 2 coats of varnish with light sanding in between. Here is what I used.


One week later after I was sure the varnish had cured, I brought the bed into the house for assembly. Here is the head board with the cutouts.

I slid the sideboard into place and fastened it with a bracket so they will not slide out.

Here are the brackets.

Here is the frame of the bed.

I next added the support slats to which the mattress would sit. I pre-drilled all the screw holds and counter-sinked them so that they would be flush. If I didn't run out of stain, I probably would have stained these pieces because I am such a perfectionist.


Here is the finished product with mattress and bedding.


I did splurge on a great pillow top mattress and feather top mattress pad, but I saved everywhere else. The bedding I found at Target last summer for 75% off! Each sheet set was only $3.75. Can you believe that??? The $74.98 hand sewn quilt was only $18.75 each. You certainly can't beat that. I did run out and buy some pillows, but I had a coupon for those so there were savings all around.


.JPG)

.JPG)
.JPG)


.JPG)

.JPG)


.JPG)
.JPG)


.JPG)

Can I tell you that this is beautiful! I just saw it on ana's brag board and I'm inspired to not only build this for my son but to recommend building this for a client of mine! I love the modifications you made to it! fabulous..xx rayan
ReplyDeleteSorry to inundate your comment section, hahah but can I also tell you that I would love for you to submit your tutorials to my PROJECT: LIBRARY. they remain your links and lead to your page, but I think everyone would benefit from your work (and there is a giveaway associated). Here is the link to the SUBMIT form: http://www.frugaldesigner.com/the-frugal-designer/submit-your-tutorial.html
ReplyDeleteyou did a fabulous job, you should be so proud! your son is so blessed to have you build his bed-what a great heirloom this is!
ReplyDeleteAMAZING!! I absolutely love this! It makes me want a room just for a daybed!
ReplyDeleteThat is beautiful, you did a great job! It looks like something out of a magazine!! I love to see what others have created from the KnockOffWood blog!
ReplyDeleteWow! This is just fantastic. I am also a crafty-bargainista mom and have been wanting to build this type of bed myself. My husband thinks I am crazy and says I should just buy it but I keep shopping it from e-bay to every shopping site and wouldn't mind paying for it to already be made if shipping and tax, etc weren't so expensive. You have just confirmed that I too can build this bed. Thanks for the inspiration!
ReplyDeleteI must admit I am totally jealous. You did it!!!! Thanks for sharing and laying it all out step by step like this. You make me believe it's possible :)
ReplyDeleteI love it!!! That is just beautiful. I wish I had one for my office, but alas my home office is too small!
ReplyDeleteThanks so much for all your wonderful comments!
ReplyDeleteI'm in love! You created the bed we've been looking for, we just didn't know it. What great style!
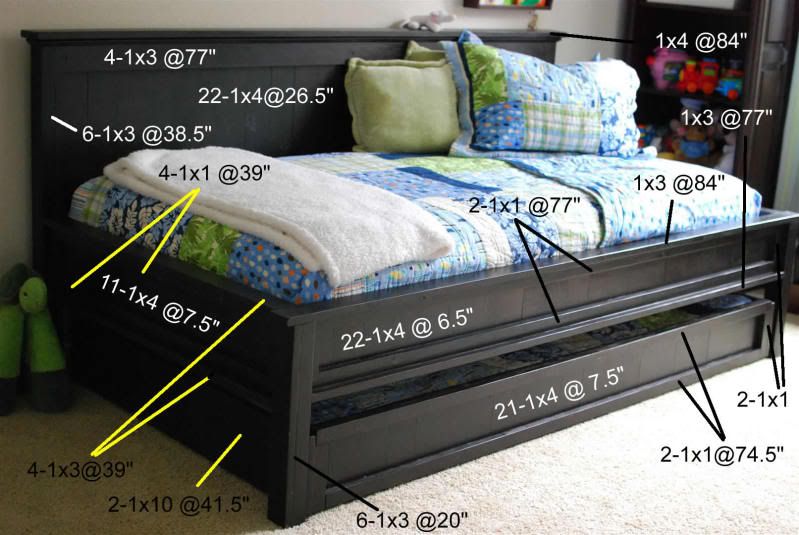
ReplyDeleteDo you happen to have your measurements that you used for the side rails? I'd love to model my daughter's bed after yours.
LymeRicky, I posted the dimensions of the bed. Let me know if you have any other questions.
ReplyDeleteYou're fantastic! Thanks for all that hard work! I've spent the last few days thinking through the bed designs and I can't wait to get started. I'm hoping to pick up the supplies next week.
ReplyDeleteAgain, thanks for all the effort -- I appreciate it a ton!
I helped my friend make a king size Farmhouse bed using Ana's plans. I just saw your plans, and I have been dying to make a bed for my daughter! I am going to start this asap! I love the modifications you did. I may be emailing you if I get stuck. :-)
ReplyDeleteWOW! I'm totally impressed. I love knock-off wood (that's how I found your daybed) and this daybed is perfect for our office/guest room. Only problem is I don't have a way to cut lumber and those fancy miter saws (or whatever they're called) are out of budget at the moment. Have people had good experiences using HD/Lowe's to make cuts?
ReplyDeleteLindz, I haven't had a problem with Lowe's making the cuts for me so long as they remeasure after each cut. If you don't remeasure after each cut, you may find some cuts running a little short.
ReplyDeletehi i love how u did the bed and was wondering if u'd share the plans you changed on the farm bed? thanks:)
ReplyDeleteI've posted the dimensions in the above post.
ReplyDeletelol sorry the pic hadn't shown :)
ReplyDeleteI have a few questions as I'm in the middle of building this do u think i could email u?
hi
ReplyDeleteI thought it might be faster to ask them here. :)
I've done the headboard panel and now on to the legs, u notched the legs for the side board, in the photo it shows the panel board sticking out to slip into the notch in the legs.
- how big did u cut the notch?
-did u just add extra panel pieces (more than the 11-1x4 u call for? ) - -how would the extra panel piece attach to the sideboard runners piece? (sorry I just don't get this part I even lied everything out on the floor to visualize it and I still don't get it :( )
-also why is the footboard 6.5 and the sides are 7.5?
thanks my email is jklmnk@gmail.com
Natasha, The notch is the size of the headboard piece so that it can be flush when you slip it on. Half of the board remains on the side board while the other half is slipped into the headboard. The foot board is 6.5 because I didn't want the bed so high and I wanted to hide as much of the trundle on the side as I could. You could make it the same size as the side board, 7.5 inches, but you would have to increase the height of the bed in order for the trundle to slide out. You can email me at craftyc0rn3r at gmail dot com if you have any other questions.
ReplyDeleteI am so inspired by you and am going to make this bed! Thank you for sharing every step of the way. So touching that your dad is so proud of you. I am sure everyone is!
ReplyDelete